
How to add a subdomain on HostGator
The instructions for adding a subdomain on HostGator this are the same whether you're adding a subdomain to your main domain or adding a subdomain to an addon domain:Subdomains are URLs for different sections of your website. They use your main domain name and a prefix. For example, if your domain is x.org a sub-domain of your domain might be support.x.org .
Subdomains are relative to your account's home directory. The icon signifies your home directory which is /home/x.
The form looks like this:

All you need to do is enter the subdomain you want and select the domain name that you want it to be a subdomain of from the dropdown list on the right. And voila, you have a subdomain! The last field is autocompleted for you once you enter the name of the subdomain.
Leave a comment if you have any problems!
Labels: hostgator, webhosting
Posted at 5:10 PM | 2 comments read on
Changing your main domain name on HostGator
If you want to change your primary or main domain name on HostGator, you need to navigate to the Change Domain Form.WARNING: Because of cPanel limitations, make sure you backup and remove any addon/parked/subdomains from the account before submitting this form, or else this domain change will fail.

I can't believe they charge you $5, when it's their fault that they didn't mention it in the beginning when you purchased their services. If you don't know have experience with HostGator or CPanel, then you're going to run into this problem if you host more than one site on your HostGator account.
HostGator uses CPanel which expects your main site files to be directly under the public_html/ directory. If you have more than one site, you can see how you're going to have a problem. Everbody not crazy wants to have separate folders for each site (the way it is in MediaTemple, and also, I think, Dreamhost).
But imagine how you're going to manage everything if you have separate folders in each site along with all the files that go with the main site, all under public_html
So it's nonsense, and I'm upset at HostGator for not mentioning anything about this when I signed up. And now as though it's not an inconvenience enough for me to "backup and remove any addon/parked/subdomains from the account" they also want me to pay $5, for a problem that they created.
I'm not happy about it. Are you? Please leave a comment!
Labels: hostgator, webhosting
Posted at 10:06 PM | 4 comments read on
Add Subdomain to an Add-On Domain on Hostgator
I thought it might be tricky but it turns out to be really easy. Here are the instructions they provide in your CPanel:Subdomains are URLs for different sections of your website. They use your main domain name and a prefix. For example, if your domain is x.org a sub-domain of your domain might be support.x.org .
Subdomains are relative to your account's home directory. The icon signifies your home directory which is /home/x.
The form looks like this:
All you need to do is enter the subdomain you want and select the main domain from the dropdown list on the right. And voila, you have a subdomain! The last field is autocompleted for you once you enter the name of the subdomain.
If you have any problems, leave a comment on this post.
Labels: hostgator, webhosting
Posted at 5:02 PM | 1 comments read on
How to Add a Domain on HostGator
I'm not really familiar with CPanel and the instructions they give you are horrible and unintuitive.And the instructions are actually greek:
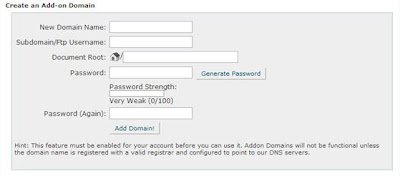
An addon domain allows you to reach a sub-domain when entering the name of the addon domain into a browser. This means that you can host additional domains from your account, if allowed by your hosting provider. Addon Domains are relative to your account's home directory. The icon signifies your home directory
That's not what we want at all. But this is the only form for adding new domains. What are you supposed to do with a form that looks like this??
Here's what I found on the HostGator forums:
1. Before you add an addon domain, Please make sure the “Name servers” for the addon domain is already pointing at you primary name servers and is propagated. Cpanel will not allow you to add the domain name unless the domain name is pointing to your server.
2. Click Addon domains
3. In the box to the right of “New Domain Name:” input the domain name for which you would like to add to your account. Please do not input “http://” or “www”
4. In the box to the right of “User name/directory/sub domain Name:” provide a name for a folder which will be placed inside of your public_html directory. What you place in the box will create a folder for you to upload your website files to for the addon domain.
5. In the box to the right of “Password:” Please provide a password for which you will use to FTP to the folder which is created for the addon domain.
6. Click Add Domain
You domain is now successfully added. If you open up a browser and type the new domain name in the address bar you will see a skeleton of your new domain. You can upload the website files to the folder which was created in the public_html of the primary domain or you may connect via FTP directly to that folder.
That's a little better.
And this is their official HostGator documentation:
Before you can add an addon domain you must change the name servers for the domain name to the ones provided for your hosting account. You cannot create an addon domain if your DNS for the site you are trying to add hasn't propagated yet.
To create an addon domain login to your cPanel and click "addon domains"
There are three fields cPanel asks for when creating an addon domain.
1. "New Domain Name:" You will put in the newdomain.com do not put www in the name!
2. "Username/directory/subdomain Name:" This will be the folder cPanel creates in your main accounts public_html folder. MAKE SURE that the name you give it doesn't already have a folder. Example... If you want to give it the username chris. You cannot have a folder in your account named chris already. If you do and still try creating the username for the addon domain to be chris you will corrupt multiple things on your account.
3. "Password:" fill in any password you want here.
After reading the above please watch our Flash movie on how to create an addon domain here.
About addon domains:
Addon domains are handled like subdomains as far as the server is concerned, but to the outside world they are separate domains.
When you setup an addon domain, you enter the domainname (without www.) and the system will automatically suggest an appropriate folder and will create that folder so don't make the folder first.
You can enter any password you like. It doesn't have to be the same as the main domain.
You don't need to create a subdomain for the addon domain.
An FTP account is created for the addon domain so when you FTP using that FTP account it will direct you to the created folder for that addon and that's where you will upload the addon site.
If you need to change the password for the addon you do it through the FTP manager.
To view stats for the addon, you look under subdomain stats.
You will setup emails for the addon domain in the main cPanel. Addon domains on a shared account do not have their own cPanel.
Anyway they make it sound a lot more complicated than it actually is. When you look at the form it can be intimidating, but once you enter a domain name (don't enter www or http), it autofills the rest of the form for you, with the exception of the password Why do you need to set another password? That's in case you are setting the domain up for somebody else for example. You wouldn't want them to use the password for your main account, right? So the password you're setting up is what someone would use to FTP files up to the new domain's directory. That's all there is to it.
Labels: hostgator, webhosting
Posted at 4:24 PM | 4 comments read on
MediaTemple SSH cheapos!
I noticed that when I'm using SSH shell console on MediaTemple they're constantly timing me out. But on Hostgator, I've never had them time me out. What's up, MediaTemple? Why so cheap?Labels: hostgator, mediatemple, webhosting
Posted at 5:34 PM | 1 comments read on
Django on Hostgator (How to Install)
Here are the instructions for installing Django on Hostgator shared hosting.
I've successfully installed Django on my Hostgator account ('Baby Croc' plan) using these steps. Hostgator has been really great for me, but they don't support fastCGI. Using vanilla CGI with Django is not generally recommended and results in crappy performance, but for a low traffic site it's bearable (barely).
I have to say that the instructions make it look pretty hard to deploy Django, but I think this may come in useful someday! Thanks to whoever wrote this. Apparently that was written in August, 2007. So no new updates since then. The thread on Hostgator forums seems pretty much dead, which is disappointing. I'm sure a lot of people are interested in hosting Django sites on Hostgator. Hopefully the Hostgator people will respond and support FastCGI.
If you have experience hosting Django on Hostgator please leave a comment. Thanks.
Posted at 2:18 PM | 1 comments read on